How to Transfer Pi Network Coin to Mainnet? (Step-by-step Guide)
ByMB Team
Updated On: October 23, 2023
Launched in March 2019, the Pi Network has garnered over 50 million engaged users from around the world. One of the reasons for the crypto project’s rapidly increasing popularity is the ease of mining it.
Unlike most crypto giants on the market, such as Bitcoin and Ethereum, users can mine Pi coins effortlessly with just a click every 24 hours on their smartphone.
However, because it is not yet listed on exchanges, it has no monetary value. To ensure that you (as a Pi holder) can perform transactions with Pi coins once the coin is listed on crypto exchanges, you must migrate your Pi coins from the Pi Network account to the mainnet.
Although the Open Mainnet has not yet launched, the core Pi team has commenced the Pi Network coin transfer to the Enclosed Mainnet. Once your Pi coins are transferred, you can use them on the Open Mainnet as well.
In this comprehensive guide, we will thoroughly go through the eight steps to migrate Pi to Mainnet.
What is Pi Mainnet?
Before you transfer your Pi coins to the Mainnet, you must understand what it is.
The Pi Mainnet is the platform where all Pi transactions will take place. It is the ultimate blockchain technology developed for Pi coin exchanges, like sending and receiving Pi coins (tokens) to and from users for different purposes.
Currently, the Mainnet is in the enclosed phase, and Pioneers can transfer their hard-mined Pi coins to it by going through the steps, as described in the below section.
The ultimate benefit of transferring your Pi tokens to the Mainnet is that you will be able to start trading with your transferred Pi coins immediately as it goes into the Open Mainnet phase.
We have covered Pi’s Mainnet in detail here.
Step-by-step guide for Pi Network coin’s transfer to Mainnet
The Pi Network has prepared a checklist for Pi’s migration to the Mainnet. You must adhere to the checklist to transfer your transferable balance to the platform.
The Mainnet checklist has eight steps in total. The eighth step allows you to migrate the transferable balance after completing the first seven steps.
Before moving on to the steps, you need to check if you have already completed any steps previously, either knowingly or unknowingly. To do so, open the Pi Network app and head to the “Mainnet” section through the sidebar.
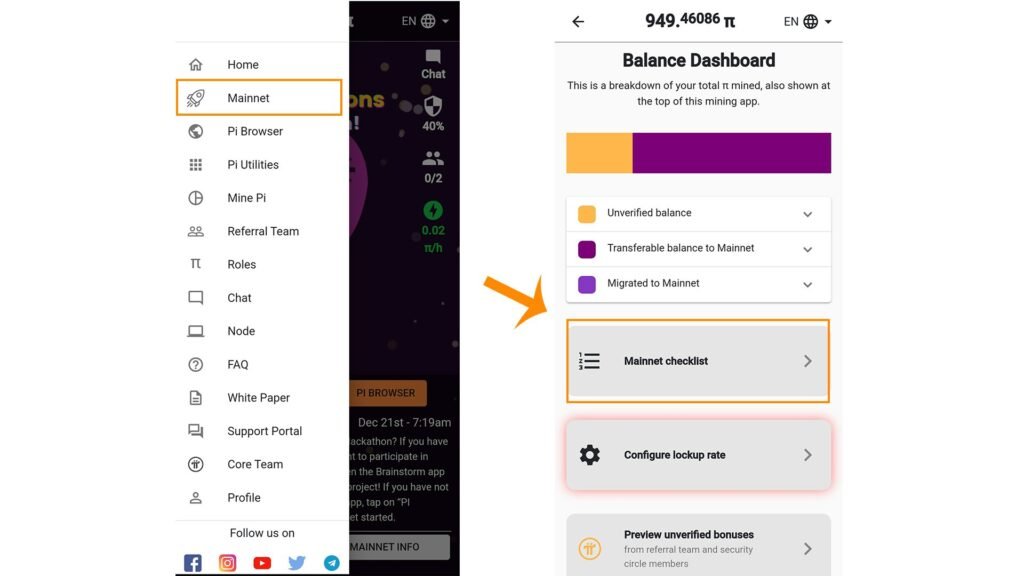
You will spot multiple options there. Click on the “mainnet checklist” option. Subsequently, scroll down to see if you have already completed specific steps. A green tab indicates the completion of the particular step. Subsequently, follow the instructions below:
Step 1: Download Pi Browser App
Pi Browser is Pi Network’s own platform that has many features including Pi KYC, Pi Wallet, Pi Chat, Fireside Forum, etc. If you haven’t downloaded it already, download and install it on your device to be able to transfer your Pi coins. It is available on both the Google Play Store and the Apple App Store.
As you do this, the first checklist tab will turn green.
Step 2: Create a Pi Wallet
The Pi wallet is the place where all your transferred Pi coins will appear. You can use those Pi coins for transactions within the enclosed mainnet as of now.
To create this wallet, open the Pi Browser app and click on the wallet option. Alternatively, you may tap on the second checklist point within the Pi Network app — you will be redirected to the Pi Browser app automatically.
If you haven’t created a wallet yet, tap on the “create new” option and subsequently click on the “generate wallet” button.
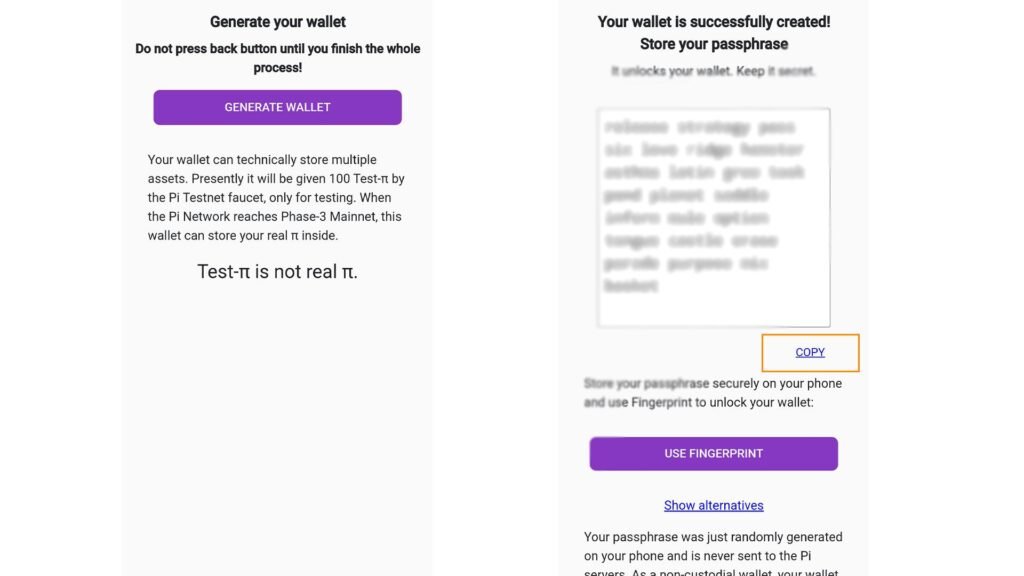
You will see a passphrase in a box. Simply copy that and keep it in a secret and safe place. You should note that you won’t be able to access your Pi wallet at any cost if you lose this passphrase, and your transferred Pi tokens will also not be accessible.
Additionally, you can set up a biometric authentication system like a fingerprint or face unlock to quickly access your Pi wallet.
You may also want to read 6 challenges for Pi Network before Open Mainnet success.
Step 3: Confirm your Pi Wallet
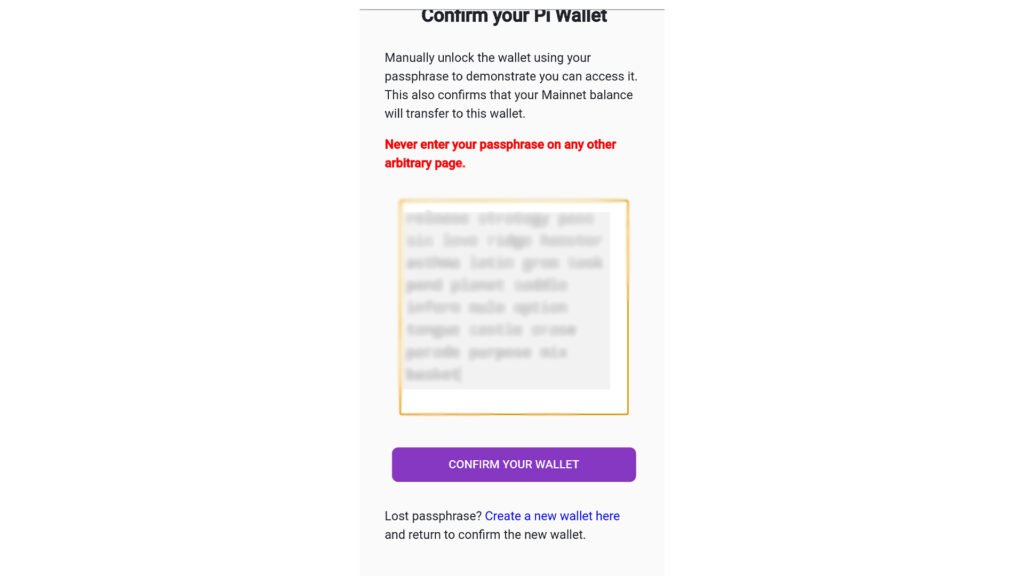
After you have created your Pi wallet, you now need to confirm it. To do so, simply click on the third mainnet checklist point, and it will direct you to a screen asking for your Pi wallet’s passphrase that you copied earlier.
Paste the passphrase in the text field and hit the “confirm your wallet” button to conclude this step.
Step 4: Commit to lockup configuration
This is the step that most people struggle with. So, follow the instructions carefully to avoid any mistakes.
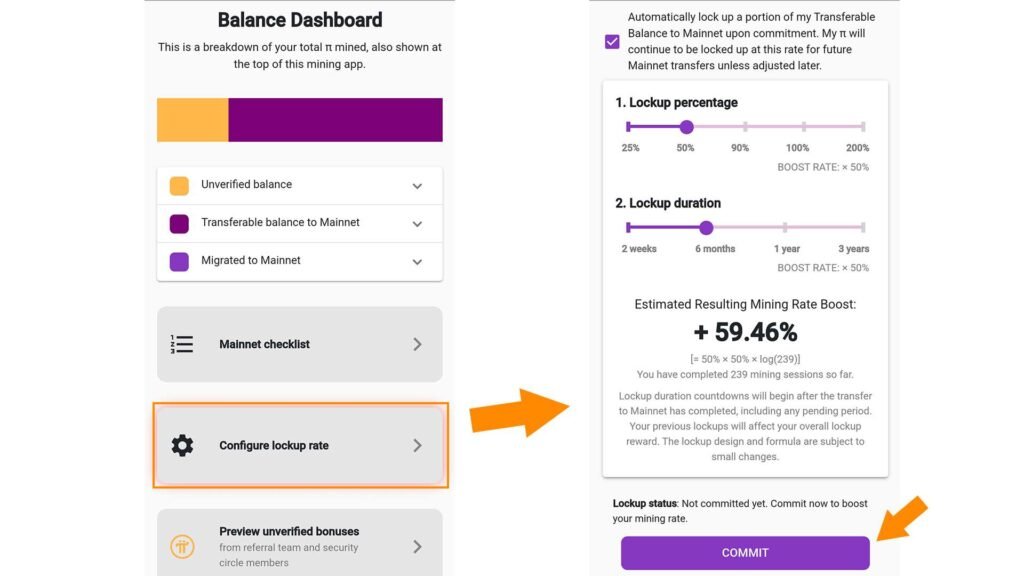
In this step, you will have to commit a certain portion of your mined Pi coins for a specific period. This will reward you with a boosted mining rate.
The more Pi coins you commit for a longer period, the higher your mining rate will be. That said, you should commit the amount of Pi coins with caution, as committed coins cannot be accessed for the specified period.
To commit to the lockup configuration, tap on the fourth checklist point or manually go to the “Configure lockup rate” option in the mainnet section. You will spot two sliders: lockup percentage and lockup duration. The former specifies the percentage of Pi coins from your total balance to be locked up. The latter specifies the duration of the lockup configuration.
It should be noted that committing to the lockup settings is not optional. You must commit to proceed to the next steps of the Mainnet checklist.
Step 5: Submit your KYC Application
KYC verification is unarguably the most crucial step to becoming eligible for Pi coin migration to the mainnet.
Before starting the KYC process, make sure you have one of the following government-issued IDs in hand: National ID, Driver’s License, or Passport. Then, launch the Pi Browser app and navigate to the KYC section.
You will see a form asking for your details and more. You will also be subjected to a liveness check. After you have completed the process, you can finally apply.
If you find the KYC process challenging, read our comprehensive guide to complete KYC verification on Pi Network with ease.
Step 6: Wait for KYC Results
After you have submitted your KYC application, you must wait for a notable period to know the status of your application.
Look at this checklist to see if your application was approved or not. If it is green and says you are now eligible to migrate to the mainnet, this means you passed the KYC verification and the doors to steps 7 and 8 will open.
You cannot move on to the following steps until you receive the KYC success status.
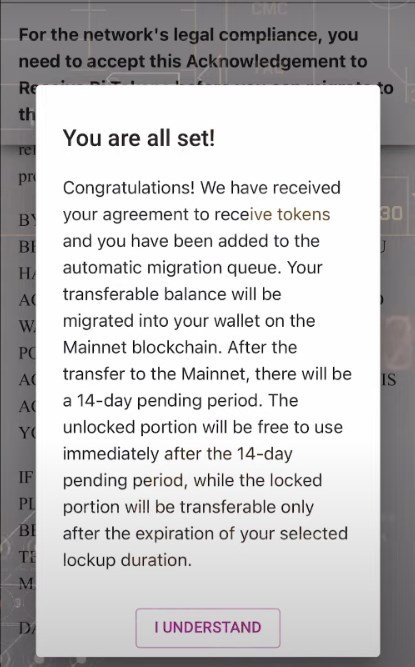
Step 7: Sign Acknowledgement to Receive Tokens
Once your KYC application is approved, you now need to sign an acknowledgment to proceed ahead. This is done as part of the Pi network’s legal compliance.
All you have to do is tap on the seventh checklist tab and a document will pop up. Read the acknowledgment document thoroughly. At the end of the document, there you will spot two buttons: “I Accept” and “I Decline.” Choose the appropriate.
To migrate Pi to Mainnet, you must click on the “I Accept” button, and then an input box will pop up asking you to enter your Pi wallet passphrase. Enter your passphrase created earlier, and then submit. This will connect your cryptographic signature to your confirmed wallet.
Step 8: Migrate to Mainnet
As you sign the acknowledgment, the migration process will initiate automatically. Your transferable Pi coins will be added to the migration queue. The coins are usually transferred to your wallet within a few hours.
However, these days, many Pioneers are expressing their disappointment that the migration process is taking several months. For some, it just shows that the migration is in queue.
We advise Pioneers to wait patiently as there might be technical issues or high network congestion, delaying the transfer. The Pi Core team ought to fix these problems as soon as possible.
It should be noted that after the Pi coins are transferred, there will be a 14-day pending period in which you cannot use the coins. But you can use them immediately after the 14-day pending period.
Note: Pi tokens in the lockup configuration will only be transferable after the lockup configuration duration is over.
This is all you have to do to transfer your Pi Network coins to the mainnet. Once your transferred coins are unlocked after the 14-day pending period, you can use them for trading, transactions, and more within the enclosed mainnet.
Fireside Forum is one of the most exciting platforms for now where you can effectively spend these coins.
Follow us on X (Twitter) to get the latest Pi Network updates!


My KYC passed at 27 April 2023 and till now I am in que at last step. What should I do?
As mentioned in the article, once you sign the acknowledgement, you will be added to the automatic migration queue. This migration may take longer than expected. Once you are migrated to the Mainnet, there will be a 14-day pending period before you can use your balance.
If it still does not solve your problem, we advise you to get involved in Pi Network’s community and ask for particular solution.
Good work pi
I made wallet but I had issue while opening the wallet so I made second wallet, now my pi has been migrated to the first wallet I have the passphrase of both the wallets, how I connect the to the wallet I made first.
Thanks & regards
Dears
i started to mine and finished on june( tratr date june 1,2023 ) my balance dashboard is 5.12345 what it to mean and how can i increase my rating of mining.
thanks
You can increase the mining rate by joining by adding members to your security circle.
I have 2 question
1. I have unluckily Lock at higher duration that is 3 years . Can my coins transfered to wallet after 14 days period or after 3 years .?
2. I have 4 members refered team but now they have lost their password how can they recover there account?
According to the instructions, the Lockup duration countdown will start after your transfer to the Mainnet. This means your coins will be transferred to the Mainnet but will not be accessible for spending for the specified period.
For Pi Network account recovery, you may go through this guide.
Hello I already did kyc and I’ve completed from step1-7 and it’s getting to 2 months now but I’ve not been migrated to mainnet. What could be the cause?
If you have already verified KYC and your Pi tokens have not been transferred to mainnet even after the 14-day pending period, this might be due to network congestion, technical issues, or a mistake in any of the previous steps. Please go over the guide again thoroughly, and if your problem persists, you should contact the appropriate authorities.
My KYC result is pending last 3 to 4 months kinldy asist what can i do ?
If possible, try reapplying for the KYC.
KYC verification how
Please go through our detailed guide for Pi Network KYC.