Pi Network KYC Verification: Ultimate Guide To Approve Pi KYC In 2024
ByMB Team
KYC (Know Your Customer) verification is a prerequisite for Pi Network users to transfer their minted Pi Coins to the mainnet, allowing them to perform transactions using the coins.
Although the KYC process is quite straightforward, a significant number of users report problems associated with document uploading, liveness checks, machine detection, and more. If you also have not approved KYC for Pi Network yet or having an issue with the process, simply go through this guide thoroughly.
In this piece, we have covered all requirements and necessary steps to get you approved. Additionally, we have addressed some most frequently raised concerns and FAQs related to Pi Network KYC verification.
Step-by-step guide to approve Pi Network KYC application
For obvious reasons, KYC verification requires a few legal documents, and the applicant must fulfill certain criteria. Therefore, you need to know the requirements before entering the actual application process, which are as follows:
Requirements and eligibility criteria to apply for Pi Network KYC
- You must be 18 years or older
- Government-issued ID: You must have the original copy of one of the following government-issued documents in hand as you will be asked to capture the picture of the ID, instead of uploading an already saved ID image.
- Passport (recommended)
- Driving License
- National ID
- Clear-looking face for a liveness check: You will be asked to take your phone’s camera in front of your face and the system will automatically capture your face. This photo will be required to verify that you are the one whose ID has been submitted. Therefore, ensure your face is easily recognizable and matches that on your ID before starting the verification process.
- Must have mined Pi for at least 30 days: A new Pioneer cannot immediately apply for KYC verification, for obvious reasons. They must mine Pi for at least 30 days (not necessarily in a consecutive manner).
- Approximately 5-10 minutes: It takes about 5 to 10 minutes to complete the KYC application.
Note: Although Pi KYC is open for all, eligibility, requirements, and availability may differ from what is shown in this article according to your country or location.
Now, let’s move on to the steps you need to follow to apply for Pi Network KYC verification.
Steps to complete the KYC verification process
Step 1: Install the Pi Browser app (it is available on the Google Play Store and the Apple App Store). Or proceed to step 2 if you already have it on your device.
Step 2: Open the Pi Network app and head to the Mainnet section. You can find the Mainnet option in the side menu.
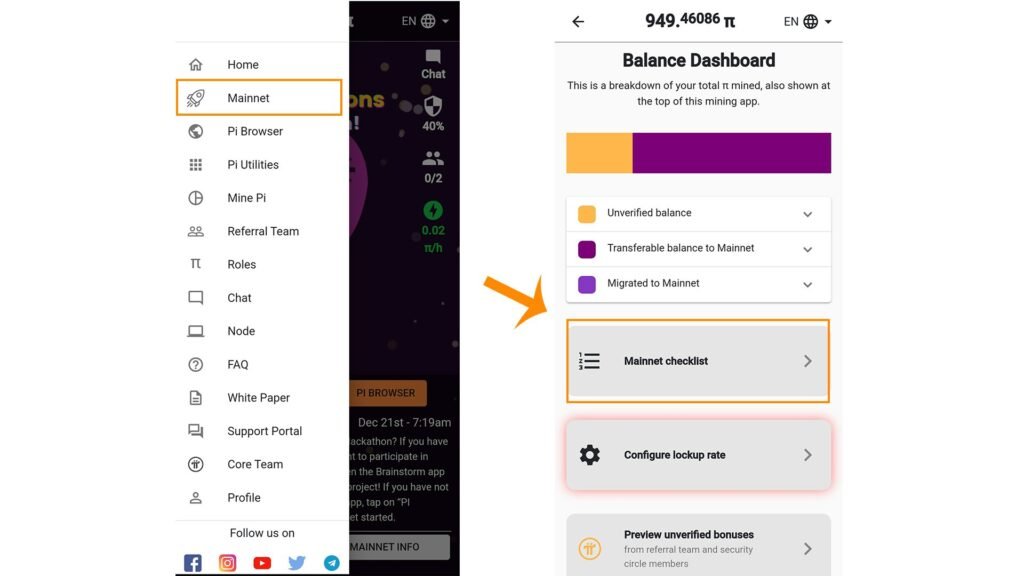


Step 3: Subsequently, tap on the Mainnet checklist tab and complete all the tasks up to the “Submit your KYC Application” task. See the detailed guide here.
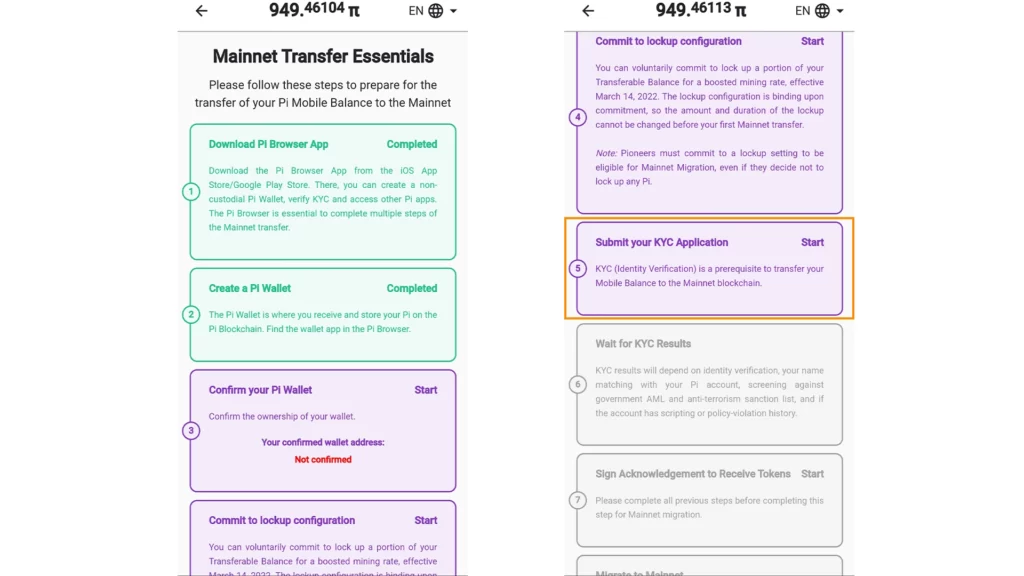
Step 4: Once you have finished the tasks listed before the KYC verification, the KYC application tab will be unlocked. Tap on it to start the application process. If it doesn’t work, manually go to the “kyc.pi” area in the Pi Browser app to launch the application process.
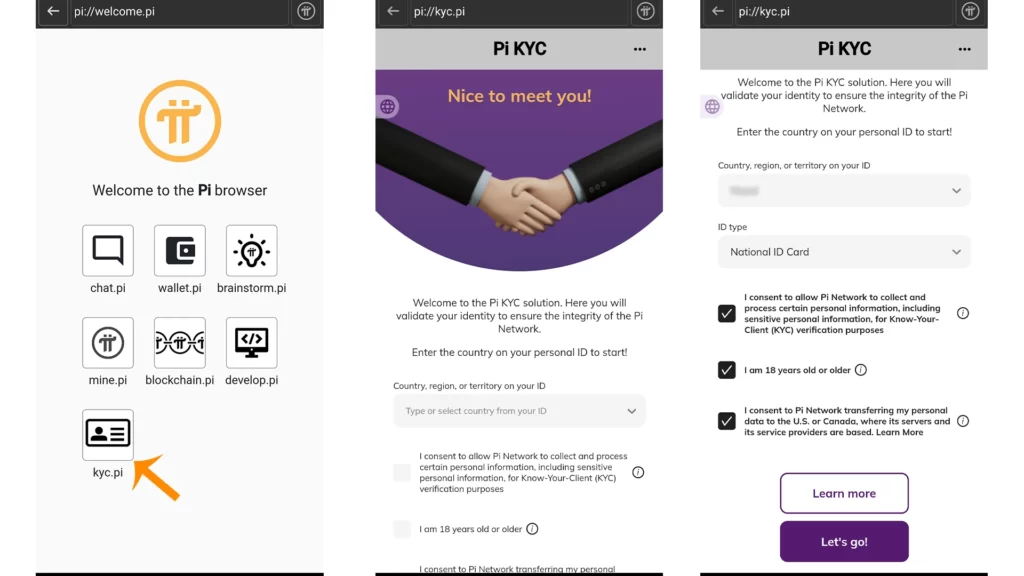
Step 5: On the first screen after entering the KYC section from the Pi Browser app, you will be asked to choose the country from a drop-down menu. Select your country as mentioned on the government-issued ID.
Step 6: Subsequently, choose the type of ID document that you want to use for the verification. A passport is recommended.
Step 7: After this, you will see four slides, providing you with instructions on how to use the ID and how to proceed properly. You should tap the next button while reading them carefully.
Step 8: Now, you will spot an “Add front photo” option on the screen. Tap on it, and the camera will turn on. Simply capture a clear image of the front of your ID. If the ID also has a back with essential information, then add a back photo too.

Remember to capture the image or save it in a horizontal (landscape) position.
Recommended
Step 9: After submitting the ID photo, you will be redirected to a form that you need to fill out with the same information as on the ID document.
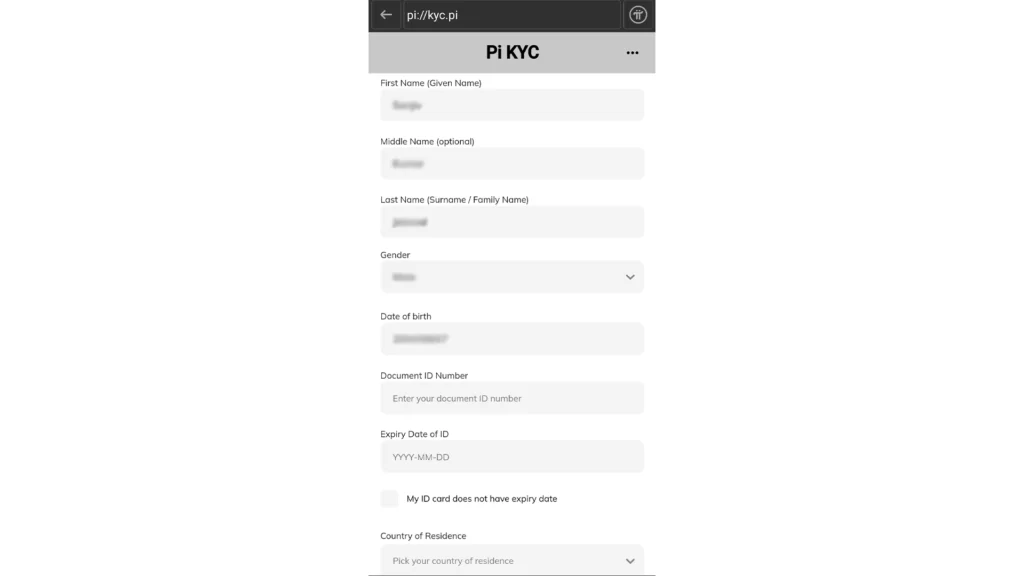
The form asks for the following details:
- First name
- Middle name (optional)
- Last name
- Gender
- Date of Birth
- Document ID number
- Expiry date of ID
- Country of Residence
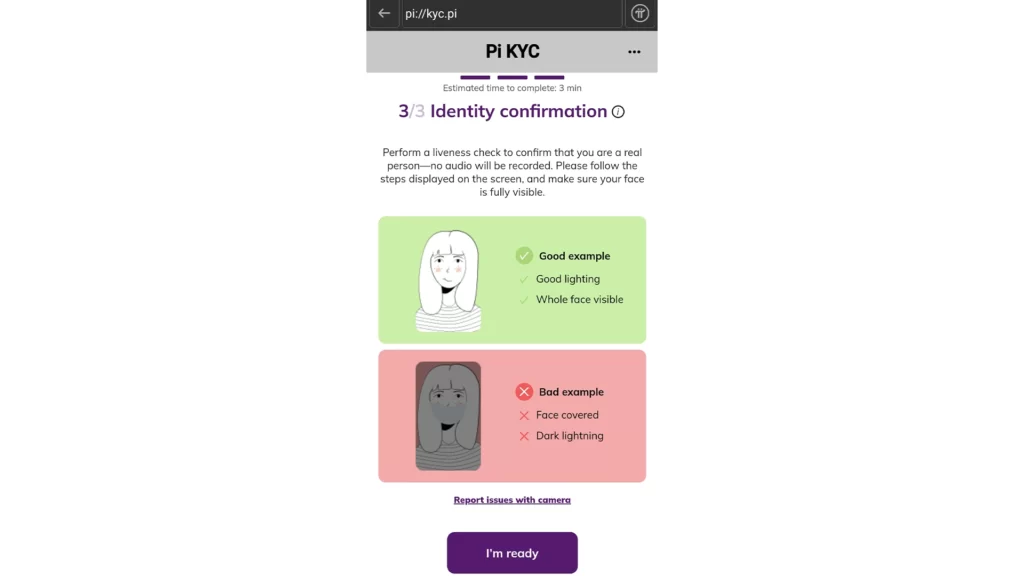
Step 10: After you submit the form, it’s time for a liveness check to confirm that you are a real person. Simply click on the “I’m Ready” button, and the front camera will turn on automatically. You need to hold the camera in front of your face so that your face is clearly visible.
This is all you need to do to verify your KYC on the Pi Network. Continue reading to learn more.
How much time does it take for KYC approval in Pi Network?
After you submit your application, it can take a few days or even months for a response about your KYC application.
However, in rare cases, you can be verified in a matter of minutes if you have provided accurate information and there are enough human validators in your country or location.
All you need to do is wait for a change in your application status. It will either be accepted or refused. In case your document is not clear and the automated machine is not able to scan key details from your ID such as your face, name, country, etc., you may be asked to capture your ID or selfie again.
How to check Pi Network KYC status?
To check the status of your KYC application, you can visit your profile in the Pi Network app. You will see a green checkmark alongside the identity verification (KYC) label, indicating that your KYC has been verified. If it shows a loading animation, then it means your application has not yet been reviewed and is pending.
Alternatively, you can also know whether you passed the KYC by going to the Mainnet checklist section. If the “Wait for KYC results” tab is green, your KYC is verified.
Note: Even after being approved, many pioneers report that their checklist tab did not turn green. This could be a problem with the Pi Network app itself. So, for your KYC application status, rely primarily on the Pi KYC app (on Pi Browser).
How does the Pi Network KYC application review process work?
Due to the tremendous size of the Pi community, it is highly impractical for the Core Team to perform identity verification for each Pioneer. As a result, they developed a KYC verification system whereby those who have already verified their KYC assist in the verification of others.
Once your documents are submitted successfully, the application goes to someone who is already KYC-verified. After being reviewed by the said person, the application is passed on to another KYC-verified person. If your application passes both validators, you will pass the KYC.
Indeed, the validators will be citizens of your nation, making the verification process considerably simpler and quicker.
For your KYC application, you will be charged 1 PI coin, which will be rewarded to the validators.
To get further information about Pi KYC, you may visit Pi Network’s official KYC FAQs↗ page.
Disclaimer: We have no affiliation with the Pi Network. This article is solely for informational purposes, and we may not be able to resolve individual KYC issues for readers.


Lovely sir
Please sir kyc hugia sir g AP me Kia karo
If you have verified your KYC, you should be active in the community to learn about the latest updates and look for privileges you can get in the Pi Network, such as transferring Pi coins to the mainnet, and more in relation to your individual circumstances.
Can I use 1 ID card for two or more accounts
No. Only one account is allowed per person. So, you cannot use the same ID for multiple accounts.
Aslamo alikum
Kyc
help me to pass kyc
Sir my kyc problem
Please hellp me
Please follow the instructions in this article carefully. You should not have any problem. However, if your photo or details are not matching the ones on the ID, it will fail. So make sure everything is fine.
Kyc pending for after long time please help me
Please kyc
KYC ltsa very good program
help me to pass kyc.
Please follow the instructions above with great focus. It should be enough for processing Pi KYC application. Make sure your details are 100% legit and your application has passed the automatic machine check and has been submitted to real KYC validators. If so, wait patiently. You should see some positive response.
Kyc pending
My KYC is pending
Is there any way I can re-apply for kyc is like I used wrong documents on My first uploading
I passed the kyc on the pi browser app but my mainnet checklist shows purple instead of green.
It should be green. If it is not yet, it may be a technical fault. So try to transfer Pi coins to the mainnet as this option is only available for KYCied users. If you are not able to do so, it is likely that your Pi account is not properly linked to the Pi Browser.
I passed the KYC on the pi browser app but my mainnet checklist step six is shows purple instead of green, please help me
This could be a problem with the Pi Network app itself. More information can be found on the official KYC FAQ page mentioned in this article.
This is what my kyc is writing to me.
My application status review in progress more than a week now.
PI not providing the KYC before 6 months
very good
KYC review in progress plss
KYC validation does not work on my iphone 6 because of a camera permission error and therefor the last step fails.
You can log in any other mobile phone by inserting your credentials there. Following the steps for KYC. Soon your KYC will be approved
Kyc slot not receive
Kyc slot not availible still😥
Cant verify Facebook and Phone Nr.
“This Page could not be loaded”
Please help
how i can change my kyc details
Hi I am not able to complete my KYC it’s loading all the time..
Please help me or provide me some link to complete my KYC thank you..
It might be due to technical issues and we advise to keep trying patiently in such situations. For now, this post is the best guide on the internet for completing Pi Network KYC. So, please go through it again as it covers from the top to the bottom of KYC verification process on Pi Network.
I don’t have a Facebook account, nor do I possess any of the 3 documents required to kyc. Please advise
Having one of the mentioned documents is mandatory to apply for the KYC verification.
You can use one mandatory document of any of your family member or trustworthy friend but make sure to update the account title on his/her name first.
My kyc pending 6 month
My KYC is pending for 5 months
Please help me to complete my KYC please!😌
Please approved my kyc
MY KYC is pending for 7 months
Hello moneybinds.com owner, Your posts are always on point.
We are glad that you liked it 🙂
I want to verify pi network kyc
Please go through the aforementioned steps and wait patiently for a positive response.
Fantastic
I sincerely appreciate your advice as regards to kyc process and completion, still on course yet to complete mine but your contribution is amazing 👍
Plz pass my kyc..
Please send me kyc
You need to go through the instructions provided to get KYC approval. No one can directly get you approved.
My kyc progress 8 month plss
Help me
Many Pioneers are having “KYC pending” issues these days. We advise you to contact official support or wait until the issue gets resolved. Pi Network officials should be working fix it.
In pi browser kyc pi loading in login screen,why?, how I can do it.
My kyc pending 6 month
Your article on Pi Network KYC is full of information and insights but my KYC is still pending. What to do now?
how to solve number 7 point in KYC anyone guide me
Good day sir my kyc got an error message due to phon evesion challenge.l have gotten a new cell phone and will like to resub mit thanks sir
hallo dear pi team
from last 3 months am continuously trying to do KYC but till now l have not received KYC request please send me
KYC request so that l can
complete my KYC
Hi Rab,
We are not the Pi Core Team and not affiliated to Pi Network in any way. You should contact the official Pi Network team via their official social handles or their contact us page on the Pi Network platform itself. We won’t be able to help you directly in anything related to the crypto project. We can just guide you!
It says that the ID information cannot be registered, it is loading, what should I do?
Please KYC complete arir
Sir, when do you think the next slot KYC verification is going to available for new users?
Or is there any other alternative way of doing the same process anywhere?
Please guide, thank you for your updates on behalf of all people, you’re doing wonderful.
cheers!
Please help me, I applied for kyc since 8 months ago but it’s not successfully completed what can I do 😞